Things have been a bit crazy around here lately...but good crazy. The end of summer has brought a lot of things to do like run our first 5k (under 37 minutes baby!!!), host a few dinner parties and a wedding shower on our back porch with our new door-turned-table that you can find here, go hunting at tag sales and estate sales, attend a vintage clothing auction, and go to the last Brimfield Antiques Market of the season. So, needless to say, there are a lot of projects and fun times to catch you all up on, but first I have to process all the pictures and write up the posts. Maybe I'll take advantage of the cooler evenings and sit with my laptop on the back porch with a warm drink...hmmmm.... There are also a lot of things coming up, like out-of-town guests to christen our guest bedroom, another race (this time 5 miles during a team marathon...), and an art show! I'll post again later (after the house is all clean for this weekend) and fill you in even more with what I've missed telling you and what's going on now.

Tuesday, September 11, 2012
Tuesday, August 14, 2012
Last Minute Crafting
Some craft projects are thought about long and hard and executed after hours of hard work and creative problem-solving. Others are created out of an immediate need. This is one of those projects.
I came home the other day and it was particularly stuffy in the apartment. You see, we have only one window in the living room and this gorgeous double door out to the deck. However, the door doesn't have a screen, so if you want to open the door to let in a breeze but don't want to let in the bugs, it is nearly impossible. And thus instant craft time ensued.
Have you ever seen those insta screen doors? Like this one. Well, it gave me an idea...so I gathered supplies and got to work.
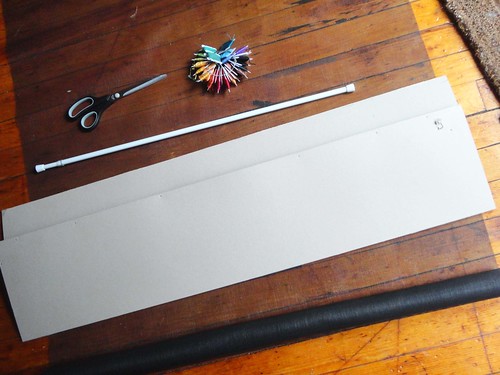
I actually ended up not using the cardboard, but forgot to retake the picture. It was a pretty simple project with a pretty simple idea. Plus it was the best kind of project because it used things I already had around the house, including some leftover nylon screening.
* Cut screening the length of the door plus about six inches.
* Fold over the top 3" to create a casing, and stitch. I decided to use some fun embroidery floss to add some interest.
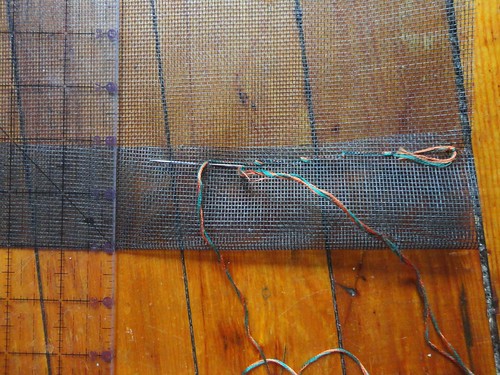
* Slide the tension rod through the casing and adjust to fit at the top of the door.
You can also create a casing at the bottom of the screen and slide in some cardboard, weights, or anything you can think of to weigh the bottom down. I left enough extra at the bottom to do just this, but I was desperate for some cool air and decided to add that feature later.
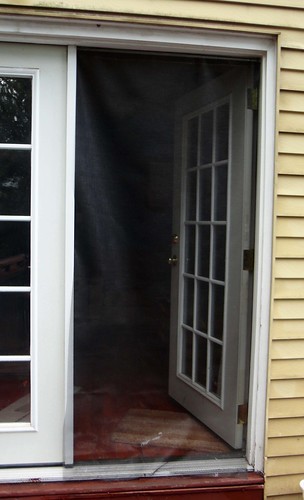
Somehow I got lucky enough that the screening we had was the exact width of the doorway. Not sure how that happened, but I sure am glad it did! If your screen is too wide, just trim it down a bit before you start. You want to make sure it will fit from side to side with a bit of extra to close any gaps. Now, this does not work for keeping cats in or out (it took Annie about 2 minutes to figure out if she headed to the corner she could just push it back). However, that might change depending on what we use to weigh it down. But it did significantly cut down on the house flies and flying insects that came into the house.
So, yay for instant crafts, a cooler house, and a project using nothing but found supplies!!!
Have you done any instant crafts lately? Become so desperate you just have to finish a project right now? Or just any home improvements? Or, in our case, removable apartment improvements?
I came home the other day and it was particularly stuffy in the apartment. You see, we have only one window in the living room and this gorgeous double door out to the deck. However, the door doesn't have a screen, so if you want to open the door to let in a breeze but don't want to let in the bugs, it is nearly impossible. And thus instant craft time ensued.
Have you ever seen those insta screen doors? Like this one. Well, it gave me an idea...so I gathered supplies and got to work.
I actually ended up not using the cardboard, but forgot to retake the picture. It was a pretty simple project with a pretty simple idea. Plus it was the best kind of project because it used things I already had around the house, including some leftover nylon screening.
* Cut screening the length of the door plus about six inches.
* Fold over the top 3" to create a casing, and stitch. I decided to use some fun embroidery floss to add some interest.
* Slide the tension rod through the casing and adjust to fit at the top of the door.
You can also create a casing at the bottom of the screen and slide in some cardboard, weights, or anything you can think of to weigh the bottom down. I left enough extra at the bottom to do just this, but I was desperate for some cool air and decided to add that feature later.
Somehow I got lucky enough that the screening we had was the exact width of the doorway. Not sure how that happened, but I sure am glad it did! If your screen is too wide, just trim it down a bit before you start. You want to make sure it will fit from side to side with a bit of extra to close any gaps. Now, this does not work for keeping cats in or out (it took Annie about 2 minutes to figure out if she headed to the corner she could just push it back). However, that might change depending on what we use to weigh it down. But it did significantly cut down on the house flies and flying insects that came into the house.
So, yay for instant crafts, a cooler house, and a project using nothing but found supplies!!!
Have you done any instant crafts lately? Become so desperate you just have to finish a project right now? Or just any home improvements? Or, in our case, removable apartment improvements?
Monday, July 16, 2012
The Story of a Tank Dress
My sister Emily posted a link on my Facebook to a blog she thought I would like...well, as usual, she was right. Not only did I immediately fall in love with, and make, the tutorial she linked to, but I spent a good portion of tonight reading all the way to the beginning! What was this wonderful blog and tutorial my sister sent me, you may ask? Sweet Verbena, right here on Blogger. Katy has some great tutorials, plus an adorable puppy that I sort of covet...he looks like Josephine, only a dog :-)
The tutorial Emily sent me was for Katy's tank-top turned dress, you can find it here. Now, I forewarn, this is not a tutorial, it is simply a few pictures showing you how it went when I followed Katy's tutorial. If you want the real thing, click on over to Sweet Verbena.
Here is the fabric, and the tank top I used. They made for a nice combination.

I followed along carefully and cut my tank top, sewed the elastic to the bottom, cut the fabric, and cut out the pockets...see...

It's a little blurry, but you get the idea. I was surprised at how easy doing the pockets were. I don't know why I always assumed pockets would be difficult, they aren't...at all.
Next, it was time to sew the skirt portion together. It looked a little funny lying on the floor...

But it turned out just how it was supposed to! Next I gathered it at the top and stitched it to the tank top. I had Jessica try it on before I ironed it, it was sort of funny because the freshly gathered skirt before ironing made it REALLY poofy at the seam and it gave Jessica a very odd shape. Luckily, after some ironing it looked pretty good. Here's Jessica's finished tank dress.

I think I just may have to make one for myself! As with all tutorials, I learned something about my own materials and how you sometimes have to adjust what you are doing based on slight differences. For instance, since ribbed tank tops have much more built in stretch, I should have made the elastic piece around the bottom a little larger to make it even easier to get on and off. Oh well, at least it still fit!
Have you discovered a new blog lately? Saw something you just had to create right then? Or just shared some inspiration with family?
The tutorial Emily sent me was for Katy's tank-top turned dress, you can find it here. Now, I forewarn, this is not a tutorial, it is simply a few pictures showing you how it went when I followed Katy's tutorial. If you want the real thing, click on over to Sweet Verbena.
Here is the fabric, and the tank top I used. They made for a nice combination.
I followed along carefully and cut my tank top, sewed the elastic to the bottom, cut the fabric, and cut out the pockets...see...
It's a little blurry, but you get the idea. I was surprised at how easy doing the pockets were. I don't know why I always assumed pockets would be difficult, they aren't...at all.
Next, it was time to sew the skirt portion together. It looked a little funny lying on the floor...
But it turned out just how it was supposed to! Next I gathered it at the top and stitched it to the tank top. I had Jessica try it on before I ironed it, it was sort of funny because the freshly gathered skirt before ironing made it REALLY poofy at the seam and it gave Jessica a very odd shape. Luckily, after some ironing it looked pretty good. Here's Jessica's finished tank dress.
I think I just may have to make one for myself! As with all tutorials, I learned something about my own materials and how you sometimes have to adjust what you are doing based on slight differences. For instance, since ribbed tank tops have much more built in stretch, I should have made the elastic piece around the bottom a little larger to make it even easier to get on and off. Oh well, at least it still fit!
Have you discovered a new blog lately? Saw something you just had to create right then? Or just shared some inspiration with family?
Wednesday, July 4, 2012
Door To Table To Art
Our latest DIY project for the apartment is finally finished! It took a long time, and a lot of scattered afternoons to get it done, but it was well worth the time and effort. We now have a door transformed to both a table and a piece of artwork.
You see, last winter an 1850s era carriage house collapsed next to our old apartment building. It was owned by our landlord and we were given the go a head to salvage a few things if we would like (obviously done after the city had demolished the building so it was safe to be around). We had always loved the look of old doors and thought this would be a great opportunity to salvage one...so we did. Here is the door before a lick of work was done.

Okay, that is slightly misguided...we'd already removed the old hardware, which was a long project on its own due to the insane amount of rust.
For almost a year the door lived on the back porch of our old apartment building until we moved to our new place and had to decide whether or not to bring it along. You see, it is a rather giant, heavy, solid door. After doing some thinking, we decided it would make a nice table that we could set up whenever we needed it but not have to keep up at all times (we don't usually have reasons to sit at a table that seats 6-8 people).
Once the nice weather finally hit, we were able to get started. We started by doing a lot of reading about refinishing old painted surfaces, since there is always a chance that the paint may contain traces of lead. So, no worries, we took the necessary precautions while doing the work.
First we sanded the door. We didn't bother to get all of the paint off, there were quite a few various layers, but we got most of it off so it would not flake.
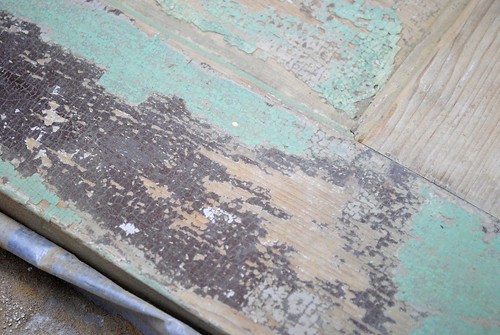
We left more paint on the side that would be the "art" side and less on the "table" side.
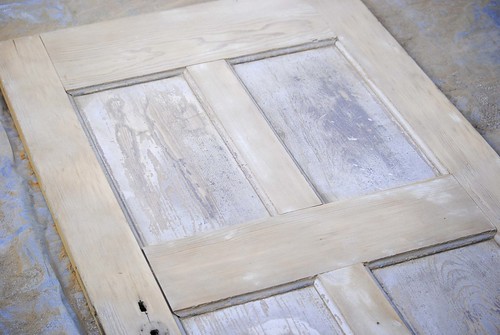
After all of the sanding, it was time to coat it. We decided on a clear polyurethane coating so the natural color of the wood would shine through, rather than using a stain/polyurethane combination. We carefully wiped down the door of all leftover sanding dust and loose paint chips and then started coating it. This process took an excessive amount of time as it kept raining, causing us to do one coat on one side and then bringing the door in after drying, rather than putting on the second coat (we did two coats on each side).
The next major piece of the table puzzle was to secure a piece of acrylic to the table surface in order to create a nice and smooth surface for eating. We did some careful reading about cutting down, drilling starter holes, and screwing into acrylic as we definitely did not want to crack it. We learned that you should go slow and spritz the drill bit or screw with cold water to keep the heat of the work from melting the acrylic.
When we finally finished, we sat it on top of its saw horse legs (that we had previously attached some grippers to so the top wouldn't slide around), and this is how she looked.
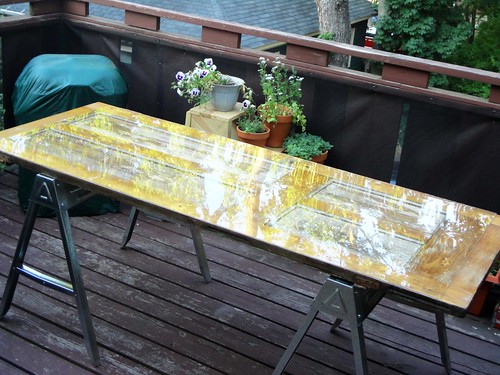
It is a little difficult to see the actual door under the acrylic as the sun was in just the wrong spot. Ah well, you get the idea (we'll post another picture on a less glaring day). Here's a picture of the "art" side of the door.
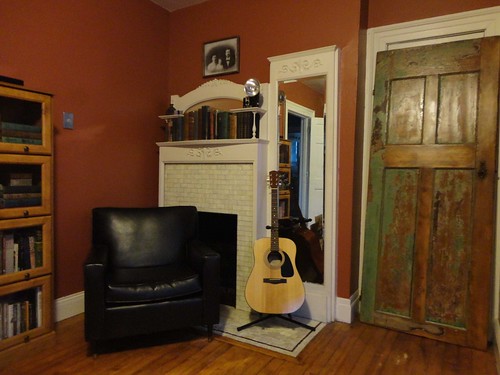
It is leaning up against one of the closets in the office. The closet holds the folding chairs for the table and the saw horse legs...so the door doesn't block anything that we typically need access to, which is nice!
Have you finished a long project lately? Taken anything from one thing to something entirely different?
You see, last winter an 1850s era carriage house collapsed next to our old apartment building. It was owned by our landlord and we were given the go a head to salvage a few things if we would like (obviously done after the city had demolished the building so it was safe to be around). We had always loved the look of old doors and thought this would be a great opportunity to salvage one...so we did. Here is the door before a lick of work was done.
Okay, that is slightly misguided...we'd already removed the old hardware, which was a long project on its own due to the insane amount of rust.
For almost a year the door lived on the back porch of our old apartment building until we moved to our new place and had to decide whether or not to bring it along. You see, it is a rather giant, heavy, solid door. After doing some thinking, we decided it would make a nice table that we could set up whenever we needed it but not have to keep up at all times (we don't usually have reasons to sit at a table that seats 6-8 people).
Once the nice weather finally hit, we were able to get started. We started by doing a lot of reading about refinishing old painted surfaces, since there is always a chance that the paint may contain traces of lead. So, no worries, we took the necessary precautions while doing the work.
First we sanded the door. We didn't bother to get all of the paint off, there were quite a few various layers, but we got most of it off so it would not flake.
We left more paint on the side that would be the "art" side and less on the "table" side.
After all of the sanding, it was time to coat it. We decided on a clear polyurethane coating so the natural color of the wood would shine through, rather than using a stain/polyurethane combination. We carefully wiped down the door of all leftover sanding dust and loose paint chips and then started coating it. This process took an excessive amount of time as it kept raining, causing us to do one coat on one side and then bringing the door in after drying, rather than putting on the second coat (we did two coats on each side).
The next major piece of the table puzzle was to secure a piece of acrylic to the table surface in order to create a nice and smooth surface for eating. We did some careful reading about cutting down, drilling starter holes, and screwing into acrylic as we definitely did not want to crack it. We learned that you should go slow and spritz the drill bit or screw with cold water to keep the heat of the work from melting the acrylic.
When we finally finished, we sat it on top of its saw horse legs (that we had previously attached some grippers to so the top wouldn't slide around), and this is how she looked.
It is a little difficult to see the actual door under the acrylic as the sun was in just the wrong spot. Ah well, you get the idea (we'll post another picture on a less glaring day). Here's a picture of the "art" side of the door.
It is leaning up against one of the closets in the office. The closet holds the folding chairs for the table and the saw horse legs...so the door doesn't block anything that we typically need access to, which is nice!
Wednesday, June 27, 2012
A Little Bit of Gardening
Well, summer is off to a great start! I spent over a week visiting family in Illinois, which means I can finally show you some of the birthday presents I made for my niece...but more on that later. I wanted to share this quick post about my spring/early summer gardening adventure. I took some of these pictures a while back and thought it was about time I post them.
It all started back in March when I was inspired by this post at Young House Love. I thought, hmmm...maybe I should try starting our herbs from seeds this year. So, I went out and picked up an indoor greenhouse and a few different herbs that we tend to use on a regular basis. It was sort of nice to see a little bit of spring start to sprout in our very cold Connecticut apartment.
By May they were ready to be re-planted outside...

We had the starts of Rosemary, Parsley, Basil, Oregano, Lavender, and Cilantro for our little herb garden...plus Catnip to draw our curious baby cats away from the other herbs! We planted them each in their own little pot, and also picked up a few flowers to plant. Now, this being my first independent container-gardening adventure, I encountered a few bumps along the way. Well, actually one major bump, but it was entirely fixable.
After a few weeks of spring rains, I realized that the large pot of flowers was looking like this...
Not good! Obviously I had a bit of a drainage problem. So, I went about on a rescue mission to save my drowning flowers. After buying some much needed supplies, including rocks for the bottom of the planter, I was ready to tackle the water problem. With a trusty turkey baster (that later went through the dish washer twice...just to make sure), I was able to siphon off most of the standing water, retrieve my drowning plants, and start all over again. Now, don't worry, I didn't just throw the sopping wet soil aside, I just redistributed it over some already existing flowerbeds in the yard where it could slowly dry out.
As I was checking everything out to see what all was contributing to the problem (aka...was I just a bad beginning gardener, or was the pot also working against me), I turned the planter over and found this...
That's right, a large planter with two...count them two drainage holes! Luckily this was easy to fix and after about 2 minutes with my handy drill I had this...
A large planter with 17 drainage holes. Much better. I proceeded to fill the bottom of the planter with rocks and replant my flowers.
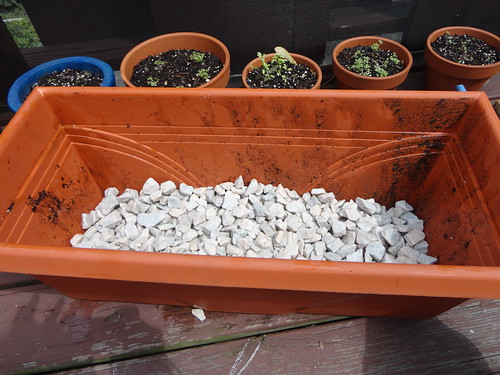
You can see the freshly planted herbs in the background. I did end up losing a few of my small white edge flowers. I think they had been too far gone when I discovered the problem and didn't survive the transplanting. However, most things made it and I think they are looking pretty good right about now.
Here is a view of the deck container garden as of a few days ago.

The flowers are all blooming and the herbs are doing great! And yes, the catnip is at the bottom of the stairs so the baby cats can get to it easily. Everything started off just sitting in a clump on this side of the deck (it gets the most sun), but we wanted to change it up a little. We went hunting and found the crate and the stairs hanging around the apartment unused, so Jess decided this would be a perfect use for them. And judging from this picture, not only was she right, but also it might be about time to make some pesto!
It all started back in March when I was inspired by this post at Young House Love. I thought, hmmm...maybe I should try starting our herbs from seeds this year. So, I went out and picked up an indoor greenhouse and a few different herbs that we tend to use on a regular basis. It was sort of nice to see a little bit of spring start to sprout in our very cold Connecticut apartment.
By May they were ready to be re-planted outside...
We had the starts of Rosemary, Parsley, Basil, Oregano, Lavender, and Cilantro for our little herb garden...plus Catnip to draw our curious baby cats away from the other herbs! We planted them each in their own little pot, and also picked up a few flowers to plant. Now, this being my first independent container-gardening adventure, I encountered a few bumps along the way. Well, actually one major bump, but it was entirely fixable.
After a few weeks of spring rains, I realized that the large pot of flowers was looking like this...
Not good! Obviously I had a bit of a drainage problem. So, I went about on a rescue mission to save my drowning flowers. After buying some much needed supplies, including rocks for the bottom of the planter, I was ready to tackle the water problem. With a trusty turkey baster (that later went through the dish washer twice...just to make sure), I was able to siphon off most of the standing water, retrieve my drowning plants, and start all over again. Now, don't worry, I didn't just throw the sopping wet soil aside, I just redistributed it over some already existing flowerbeds in the yard where it could slowly dry out.
As I was checking everything out to see what all was contributing to the problem (aka...was I just a bad beginning gardener, or was the pot also working against me), I turned the planter over and found this...
That's right, a large planter with two...count them two drainage holes! Luckily this was easy to fix and after about 2 minutes with my handy drill I had this...
A large planter with 17 drainage holes. Much better. I proceeded to fill the bottom of the planter with rocks and replant my flowers.
You can see the freshly planted herbs in the background. I did end up losing a few of my small white edge flowers. I think they had been too far gone when I discovered the problem and didn't survive the transplanting. However, most things made it and I think they are looking pretty good right about now.
Here is a view of the deck container garden as of a few days ago.
The flowers are all blooming and the herbs are doing great! And yes, the catnip is at the bottom of the stairs so the baby cats can get to it easily. Everything started off just sitting in a clump on this side of the deck (it gets the most sun), but we wanted to change it up a little. We went hunting and found the crate and the stairs hanging around the apartment unused, so Jess decided this would be a perfect use for them. And judging from this picture, not only was she right, but also it might be about time to make some pesto!
Have you done any container gardening? Did you have instant success or end up on a learning curve like me? Or just re-purpose anything from around the house lately?
Monday, May 21, 2012
A Great Week
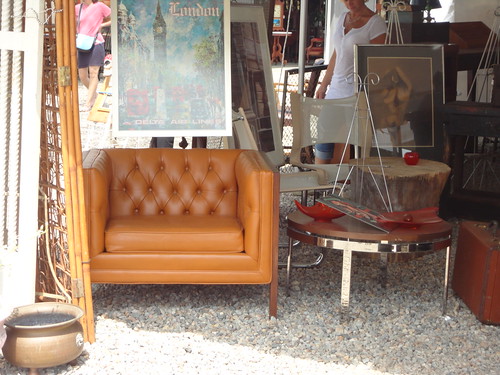
Well, I think I have finally recovered from last week's Brimfield excursion. We've managed to get our Brimfield trips down pretty well...we know which vendors have stuff we like, where the prices are good, and who is willing to haggle. We've also figured out how to see everything we want to see and get in and out in under 6 hours! Granted, when we decide to make the trek without a trusty list in hand and predetermine to just wander around and look for what inspires us, well....those trips are a bit longer...
This, was not one of those trips. We managed to get very lucky and found the most desired and largest item on our list (a club-style chair for the living room) towards the beginning of the day, which meant we knew exactly how much room was left in the car for bringing home other treasures. It is always fun to see people stop and watch us as we carefully maneuver our treasures into our Pontiac Vibe...it isn't a large vehicle, but as we are fond of saying "it may be small, but we know exactly how big it is." Here is what we brought home...
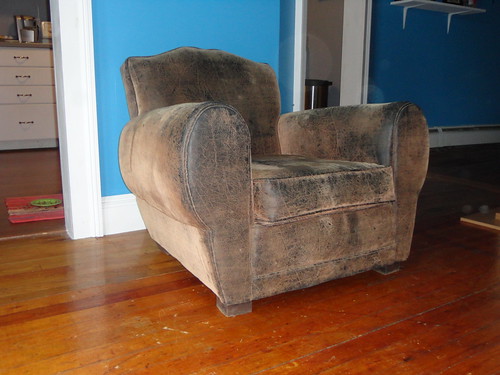
And yes, our beautiful cat Annie thinks that we bought it just for her sleeping enjoyment! Ah well, whatever keeps her happy...as long as she shares.
Here is a glimpse of some items that did not make it home with us, but were sufficiently drooled over...

This, was not one of those trips. We managed to get very lucky and found the most desired and largest item on our list (a club-style chair for the living room) towards the beginning of the day, which meant we knew exactly how much room was left in the car for bringing home other treasures. It is always fun to see people stop and watch us as we carefully maneuver our treasures into our Pontiac Vibe...it isn't a large vehicle, but as we are fond of saying "it may be small, but we know exactly how big it is." Here is what we brought home...
And yes, our beautiful cat Annie thinks that we bought it just for her sleeping enjoyment! Ah well, whatever keeps her happy...as long as she shares.
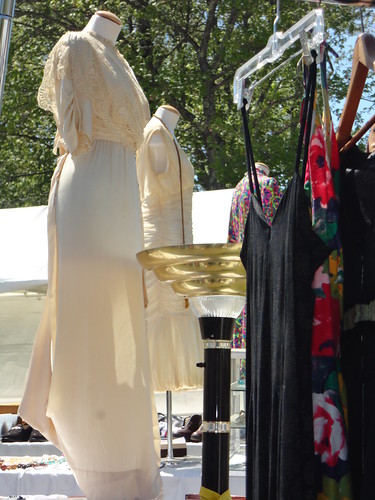
Here is a glimpse of some items that did not make it home with us, but were sufficiently drooled over...
Our circa 1912 bride just barely didn't come home with us. We found her at the end of the day and by then had already spent our budget for the event..and I was trying to be good. So instead, I just snapped this quick picture and will look for her again in July. Doubtful she'll still be there, but you never know at Brimfield.
After our weekend trip, we had a nice week of good weather and managed to enjoy some of it with a friend of ours. It was our first real dinner guest at our new place. We made veggie kabobs with homemade bbq sauce, grilled pineapple, fresh tomatillo salsa, and potatoes with onions and sage...and awesome vegan apple cinnamon cupcakes for dessert! We didn't have our table project finished yet (which you will all get to see eventually) so we ate out on the back deck and used the deck box as a table. Of course it was dressed up with some vintage linens from my Aunt and our awesome serving dishes.
Yay for friends and a good week. Here's hoping this coming week is just as great.
Have you found any treasures lately? Had to pass something up because you were "being good?" Or just had a friend over to enjoy a nice Spring evening?
Wednesday, May 9, 2012
Going to Brimfield???
We are!!! If you've been following my blog for the past year, you will have already noticed that I LOVE Brimfield week. Well, weeks actually. We try and go to all three Brimfield weeks because they are just that awesome. I thought that instead of just writing my usual look-at-the-cool-things-I-found-at-Brimfield post after the fact, that I would write a short post before the weekend with a few tips that I've learned from our Brimfield excursions.

Here are my top tips (in no particular order) for any Brimfield adventurer:
* Dress/pack for ANY weather condition...even if it is 90 degrees and sunny, do NOT leave home without a rain jacket in the back of the car...similarly, even if it's raining, don't forget the sunscreen...the weather can change in an instant and it is easier to walk back to the car than to be miserable for the next 6 hours.
* On a similar note, wear appropriate shoes...even if it rained on Tuesday and you are going on Sunday, chances are the ground is still mucky and wet from Tuesday and all of the foot traffic, combined with the severe lack of grass by the end of the week will make for uneven ground...also wear shoes that you will actually want to walk in for hours on end.
* Take a backpack/messenger bag...there are many, Many, MANY small items at Brimfield and if you don't have a place to put your treasures as you begin to collect them you will find yourself either needing to constantly run back to the car, or playing a delicate balancing act in your arms for the rest of your visit (which makes it that much harder to go digging through and finding even more treasures).
* Take Cash! Although some of the merchants are set up to take credit cards, and some will take personal checks, your best bet is to pay with cash...there are ATMs on the grounds, but better to be safe than sorry...it also makes it much easier to stick to a budget and only spend the cash you have...(note, be mindful any time you are carrying large amounts of cash, we have never had a problem at Brimfield but we always take precautions like splitting the cash between us and also keeping some in various places...all of it in the backpack + backpack left at lunch table = big problem!)
* Make a list if you can...this is an entirely personal choice, but I find that Brimfield can be extremely overwhelming if you are only going for one day and plan to look at everything...we like to make a list of the major pieces we are looking for so we have our sights set on something...this does not mean that we don't look at everything, but sometimes it can help us decide if a tent is even worth going into...on our first trip to Brimfield we were completely unprepaired and by the end of it I felt like crawling into the fetal position because of the extreme amount of inspiration and things to see.
This year our Brimfield adventure will likely consist of:
--dressing in layers: hiking pants (cool if it's hot, and dry quickly in the rain), t-shirt layered over a tank top, long sleeve shirt or sweatshirt, hat to keep off the sun, and tennis shoes, plus an extra pair of socks and a rain jacket in the car just in case
--backpack containing: sunglasses, bottle of water, hand sanitizer and small travel roll of toilet paper (there are port-a-potties, but there are also thousands of people...things run out), and small reusable shopping bag just in case
--The List: chairs (for reading), old camera/surveyor's tripod, and always on the list are textiles/costumes/sewing supplies (me) and Maxfield Parrish prints/anything Stickley inspired (Jess)
Well folks, those are my words of wisdom. I hope you decide to venture out to Brimfield this week (May 8th-13th)...and if you end up there on Sunday you just might see me!!!!
Happy Hunting!!
Do you obsessively make lists? Do you find them helpful at antique shows/flea markets? Or are you the dive-in-and-see-what-happens type?
Here are my top tips (in no particular order) for any Brimfield adventurer:
* Dress/pack for ANY weather condition...even if it is 90 degrees and sunny, do NOT leave home without a rain jacket in the back of the car...similarly, even if it's raining, don't forget the sunscreen...the weather can change in an instant and it is easier to walk back to the car than to be miserable for the next 6 hours.
* On a similar note, wear appropriate shoes...even if it rained on Tuesday and you are going on Sunday, chances are the ground is still mucky and wet from Tuesday and all of the foot traffic, combined with the severe lack of grass by the end of the week will make for uneven ground...also wear shoes that you will actually want to walk in for hours on end.
* Take a backpack/messenger bag...there are many, Many, MANY small items at Brimfield and if you don't have a place to put your treasures as you begin to collect them you will find yourself either needing to constantly run back to the car, or playing a delicate balancing act in your arms for the rest of your visit (which makes it that much harder to go digging through and finding even more treasures).
* Take Cash! Although some of the merchants are set up to take credit cards, and some will take personal checks, your best bet is to pay with cash...there are ATMs on the grounds, but better to be safe than sorry...it also makes it much easier to stick to a budget and only spend the cash you have...(note, be mindful any time you are carrying large amounts of cash, we have never had a problem at Brimfield but we always take precautions like splitting the cash between us and also keeping some in various places...all of it in the backpack + backpack left at lunch table = big problem!)
* Make a list if you can...this is an entirely personal choice, but I find that Brimfield can be extremely overwhelming if you are only going for one day and plan to look at everything...we like to make a list of the major pieces we are looking for so we have our sights set on something...this does not mean that we don't look at everything, but sometimes it can help us decide if a tent is even worth going into...on our first trip to Brimfield we were completely unprepaired and by the end of it I felt like crawling into the fetal position because of the extreme amount of inspiration and things to see.
This year our Brimfield adventure will likely consist of:
--dressing in layers: hiking pants (cool if it's hot, and dry quickly in the rain), t-shirt layered over a tank top, long sleeve shirt or sweatshirt, hat to keep off the sun, and tennis shoes, plus an extra pair of socks and a rain jacket in the car just in case
--backpack containing: sunglasses, bottle of water, hand sanitizer and small travel roll of toilet paper (there are port-a-potties, but there are also thousands of people...things run out), and small reusable shopping bag just in case
--The List: chairs (for reading), old camera/surveyor's tripod, and always on the list are textiles/costumes/sewing supplies (me) and Maxfield Parrish prints/anything Stickley inspired (Jess)
Well folks, those are my words of wisdom. I hope you decide to venture out to Brimfield this week (May 8th-13th)...and if you end up there on Sunday you just might see me!!!!
Happy Hunting!!
Monday, April 23, 2012
The New Apartment...the After
We had our first visitors to the new apartment this weekend. They weren't stay-over visitors, but they were coming so it meant cleaning! And, since we cleaned the new apartment (yes, some of that meant merely shoving things in closets for the moment), it was a perfect time to snap a few shots of the new place to share. I hope you all enjoy!
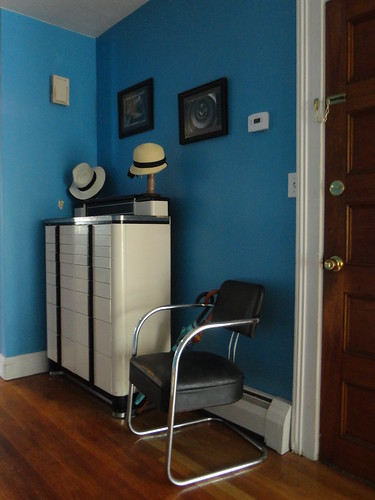
Here's a shot of the Entryway. It was a great place to put our dental cabinet from Brimfield and our simple, sleek black chair. It's close enough to the living room that we can pull it in when we need extra seating, but it works great here for taking on and off rain boots.

This is our Living Room. It's almost the exact same size as our old living room, but set up differently. Just to the left is the entryway and barely visible to the right are the french doors on to the deck. Further to the right is....

The Kitchen! Jessica used some of that fabulous curator knowledge to come up with the idea of hanging our orange metal tray and large wooden serving tray on the wall as art using L-pins. That way we can spin the pins to get them off the wall when we want to use them, but when they aren't in use they are easily stored and give some decoration to the kitchen. And, see that spot above the cabinets? With some clever engineering we were able to use the tops of the cabinets as storage for all our cookbooks. Yes, I have to stand on the counter to get to them, but at least they are in the kitchen!
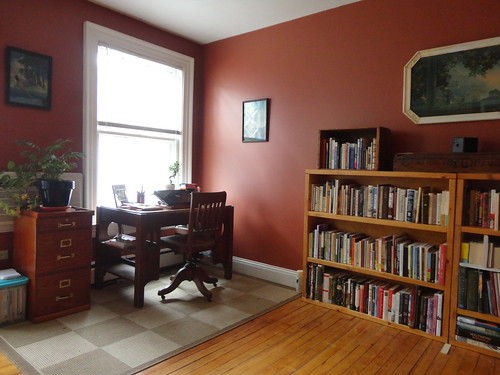
Here's Jessica's Office, which will also be used as the Dining Room when we have Dinner Club at our place. This room is actually twice as large as it appears, but the other half is still housing some unpacked boxes...so maybe you'll see it later!

And finally here is the sewing/crafting area of the Spare Room that I claimed for my own. There is also an antique desk in another corner, from which I am writing this post, but I forgot to snap a picture. So, you'll also have to wait to see that.
I hope you've enjoyed the brief tour of our apartment, and all the new paint colors! More pictures will eventually crop up as more and more gets done around the apartment, and especially around the back porch...but that project is on hold until all this rain clears away. I guess I should be glad, it is letting me get away without watering my plants this week.
Have you made a brave and bold color choice lately? Painted any rooms dark red or bright blue?
Here's a shot of the Entryway. It was a great place to put our dental cabinet from Brimfield and our simple, sleek black chair. It's close enough to the living room that we can pull it in when we need extra seating, but it works great here for taking on and off rain boots.
This is our Living Room. It's almost the exact same size as our old living room, but set up differently. Just to the left is the entryway and barely visible to the right are the french doors on to the deck. Further to the right is....
The Kitchen! Jessica used some of that fabulous curator knowledge to come up with the idea of hanging our orange metal tray and large wooden serving tray on the wall as art using L-pins. That way we can spin the pins to get them off the wall when we want to use them, but when they aren't in use they are easily stored and give some decoration to the kitchen. And, see that spot above the cabinets? With some clever engineering we were able to use the tops of the cabinets as storage for all our cookbooks. Yes, I have to stand on the counter to get to them, but at least they are in the kitchen!
Here's Jessica's Office, which will also be used as the Dining Room when we have Dinner Club at our place. This room is actually twice as large as it appears, but the other half is still housing some unpacked boxes...so maybe you'll see it later!
And finally here is the sewing/crafting area of the Spare Room that I claimed for my own. There is also an antique desk in another corner, from which I am writing this post, but I forgot to snap a picture. So, you'll also have to wait to see that.
I hope you've enjoyed the brief tour of our apartment, and all the new paint colors! More pictures will eventually crop up as more and more gets done around the apartment, and especially around the back porch...but that project is on hold until all this rain clears away. I guess I should be glad, it is letting me get away without watering my plants this week.
Have you made a brave and bold color choice lately? Painted any rooms dark red or bright blue?
Tuesday, April 17, 2012
Before and After: Stereo Cabinet
Moving into our new apartment has been stressful, exciting, and a challenge. One of the first challenges we faced was what to do with the television. Our new living room is about the size and shape of our old living room (narrow and rectangular) but our old set-up just was not going to work. At our previous apartment, the TV sat on a short bookcase with a large bookcase on either side, which was great since that was the only available place to keep all our books. However, now that our books are kept in an entirely separate room, we could do something a little less imposing for the TV.
We decided that something light and airy would be perfect, and settled on a mid-century credenza-style TV stand. After realizing that a credenza might be a bit long for the wall, we decided to keep an open mind, but stick to that sort of look. Of course, we did not want to just go out and buy something, because we pride ourselves on a nice mix of aesthetics in our apartment: antique, contemporary, refurbished, bold, neutral, etc. So, after carefully measuring our space, we went on the hunt. I think we each trolled Craigslist about five times a day, plus stopped in every antique store and resale shop we came across over the last month. Finally we found something! Below is a brief history of how we made our new TV stand...
After relentless searching, we finally found this gem on Craigslist last week for.....$50!!!! I'd say that's a pretty perfect price!
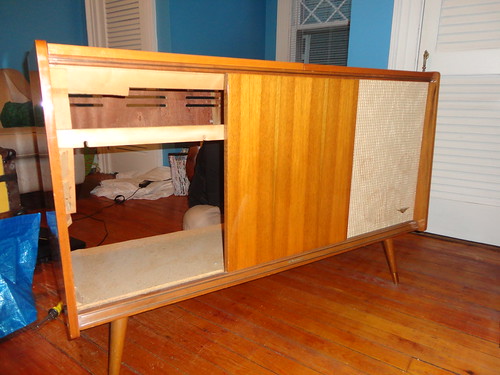
Now, don't get confused. After we picked it up and got it home I thought "hmmm...I'll put in dinner and then we can start working on this while it cooks." Silly Me! I forgot how we work in our household...something comes in and it INSTANTLY gets started! By the time I put dinner in the oven, Jess had already taken one of the speaker fronts off...so this is only a sort-of before picture.
As you may have realized with the mention of speaker fronts, this is not a credenza but a mid-century stereo cabinet. The previous owner had already removed all the internal workings for the stereo, but that just made our job less difficult and much less guilt ridden! (For the longest time we were finding "working" stereo cabinets online but just couldn't muster the resolve to rip out a perfectly good stereo.) Since the finish on the wood was in beautiful shape, we did not have to worry about stripping or refinishing.
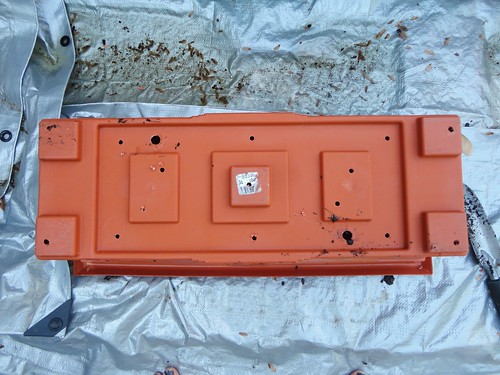
We built a shelf to go inside each of our soon-to-be-created cabinets. One on the right measured to fit the DVD player, old-school Nintendo, and the Wii; and one on the left to hold some of our DVDs.
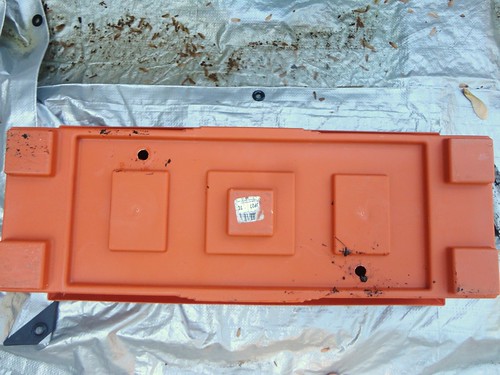
When we pulled off the speaker fronts we were left with this...
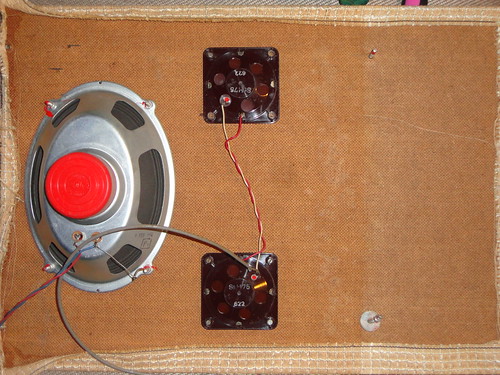
We removed all the speaker components and the old fabric coverings...being careful to first remove the applied stereo emblem so we could re-attach it later. It was amazing how many teeny tiny bolts, nuts, and washers were holding this thing on!
Next we covered the speakers with a thin layer of batting to camouflage the holes left by the speakers, and then covered the entire front with some fun fabric purchased for just this occasion.
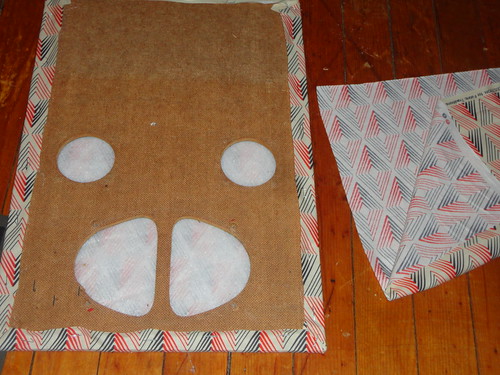
We decided to go with something modern, but with a vintage feel to compliment the mid-century design. After wrapping the front tightly and stapling it around back, we cut a piece to cover up the backside so when the door is open you can't see the rough edges. We didn't want the staples showing, so after turning under the edges it was hot glued in place.
Once the doors were finished, we added gold nobs, replaced the stereo emblem and hinged the doors onto the front of the cabinet. This is where our major "oops!" moment came in...we had cut down the top of the speakers so they would sit on the outside of the cabinet (they had originally been mounted on the inside) but had forgotten to cut down the sides to allow for the hinges. However, with some quick thinking from Jess, the doors were mounted and it was ready for the television.
 And here is the finished product...plus a sneak peak of the wall color in the living room.
We were pretty pleased with how our first furniture DIY for the new apartment turned out.
Have you ever tried making over a piece of furniture? Did you find it harder than all those blogs make it look, or easier? Most importantly, did you follow that good ol' fatherly advice to measure twice and cut once?!?
We decided that something light and airy would be perfect, and settled on a mid-century credenza-style TV stand. After realizing that a credenza might be a bit long for the wall, we decided to keep an open mind, but stick to that sort of look. Of course, we did not want to just go out and buy something, because we pride ourselves on a nice mix of aesthetics in our apartment: antique, contemporary, refurbished, bold, neutral, etc. So, after carefully measuring our space, we went on the hunt. I think we each trolled Craigslist about five times a day, plus stopped in every antique store and resale shop we came across over the last month. Finally we found something! Below is a brief history of how we made our new TV stand...
After relentless searching, we finally found this gem on Craigslist last week for.....$50!!!! I'd say that's a pretty perfect price!
Now, don't get confused. After we picked it up and got it home I thought "hmmm...I'll put in dinner and then we can start working on this while it cooks." Silly Me! I forgot how we work in our household...something comes in and it INSTANTLY gets started! By the time I put dinner in the oven, Jess had already taken one of the speaker fronts off...so this is only a sort-of before picture.
As you may have realized with the mention of speaker fronts, this is not a credenza but a mid-century stereo cabinet. The previous owner had already removed all the internal workings for the stereo, but that just made our job less difficult and much less guilt ridden! (For the longest time we were finding "working" stereo cabinets online but just couldn't muster the resolve to rip out a perfectly good stereo.) Since the finish on the wood was in beautiful shape, we did not have to worry about stripping or refinishing.
We built a shelf to go inside each of our soon-to-be-created cabinets. One on the right measured to fit the DVD player, old-school Nintendo, and the Wii; and one on the left to hold some of our DVDs.
When we pulled off the speaker fronts we were left with this...
We removed all the speaker components and the old fabric coverings...being careful to first remove the applied stereo emblem so we could re-attach it later. It was amazing how many teeny tiny bolts, nuts, and washers were holding this thing on!
Next we covered the speakers with a thin layer of batting to camouflage the holes left by the speakers, and then covered the entire front with some fun fabric purchased for just this occasion.
We decided to go with something modern, but with a vintage feel to compliment the mid-century design. After wrapping the front tightly and stapling it around back, we cut a piece to cover up the backside so when the door is open you can't see the rough edges. We didn't want the staples showing, so after turning under the edges it was hot glued in place.
Once the doors were finished, we added gold nobs, replaced the stereo emblem and hinged the doors onto the front of the cabinet. This is where our major "oops!" moment came in...we had cut down the top of the speakers so they would sit on the outside of the cabinet (they had originally been mounted on the inside) but had forgotten to cut down the sides to allow for the hinges. However, with some quick thinking from Jess, the doors were mounted and it was ready for the television.
We were pretty pleased with how our first furniture DIY for the new apartment turned out.
Have you ever tried making over a piece of furniture? Did you find it harder than all those blogs make it look, or easier? Most importantly, did you follow that good ol' fatherly advice to measure twice and cut once?!?
Tuesday, April 3, 2012
The Before...
March was a CRAZY month! We painted, we moved, we moved, and we moved some more. Here are just a few quick pictures from before the painting and after we get things all unpacked I'll get some pictures of our new paint scheme. Even though it is a rental, we think it is well worth the effort to paint. I fully believe that a coat of paint is the fastest way to make a place your own.
Enjoy the pictures!
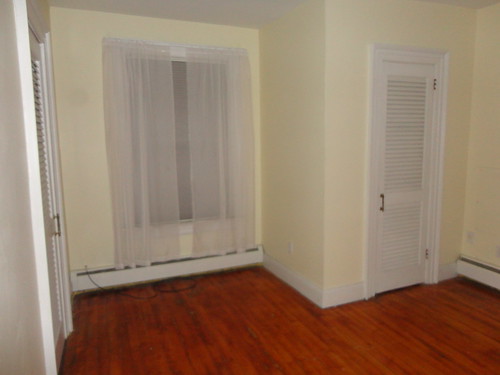
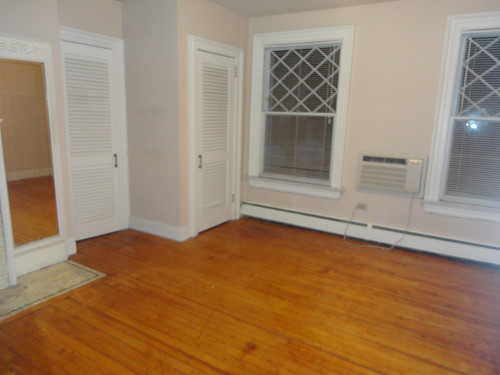
One Bedroom...
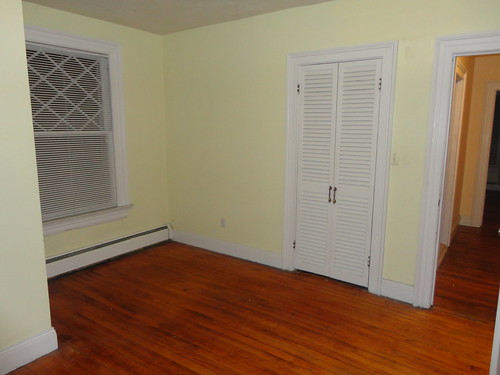
And the other...
The Office/Library/Dining Room....

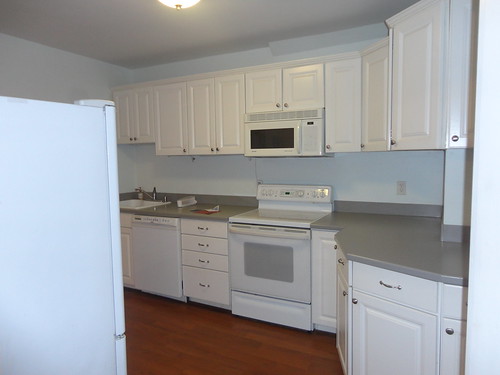
The Living Room above and Kitchen below...
Have you ever painted a rental?
Enjoy the pictures!
One Bedroom...
And the other...
The Office/Library/Dining Room....
The Living Room above and Kitchen below...
Have you ever painted a rental?
Thursday, February 23, 2012
One 1810s dress...DONE!
I finally finished Kate's dress and spencer jacket this weekend. I was in need of a little added inspiration, so I put on Mansfield Park and set to work. All in all it turned out pretty well. The spencer gave me some headaches, but since I do not yet have a lot of practice in pattern adjustment I think it all worked out in the end. Here is the finished product

Kate is coming to pick it up on Sunday and I can't wait to see how the spencer fits. The last time she tried it on it was a muslin mock-up with one sleeve!
In other news, you might start seeing a little bit more decorating type DIY on Midwest Nutmeg. We are moving into a new apartment and it needs a little bit of design to make it home. So, expect a few DIY home projects, before and after photos, and who knows what else. It is a new and exciting adventure!
Have you finished any projects lately? Or planning any life changes?
Wednesday, February 15, 2012
Valentine's Day...a little late
Yesterday was Valentine's Day and I made some really cute cards, but you'll have to see them later...my camera doesn't want to let me dump my pictures so I don't have any to post :-( So, instead, you are getting a post about one of my new favorite things...
I saw a post today on one of my favorite design blogs, Apartment Therapy and knew I had to share. There is a new little toy over at Sherwin Williams called Chip It! It lets you pick your favorite internet picture and then "chip it." The site takes the main colors in the photo and tells you the Sherwin Williams color chips that most closely match it. It is awesome!
I wish we had found this snazzy little tool about 3 weeks ago. We are moving to a new place and decided that the colors in the apartment would be the same as those incorporated into our favorite art print...imagine how much easier it would have been if we could have just found the print online and chipped it!!
Any internet tools you find helpful when redecorating?
Wednesday, February 1, 2012
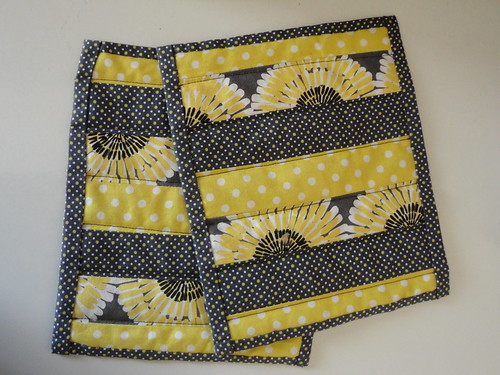
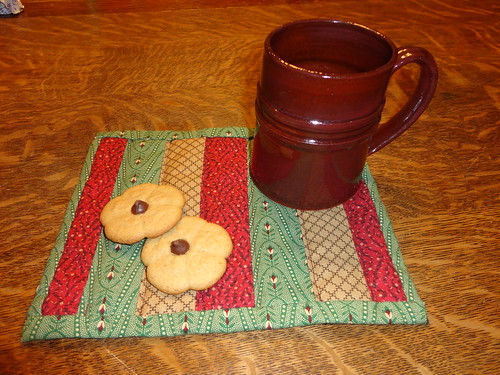
Mug Rugs
Remember all that fun fabric I bought just before Christmas for making presents? Well, now that the recipients have them, I can finally show you what I made.
I made.....MUG RUGS! Each person's fabric coordinated with their tastes.
Some were traditional...
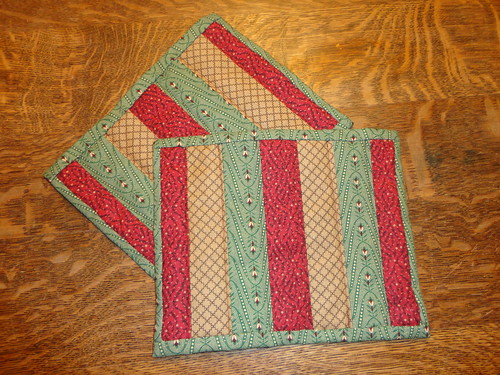
Some were more modern...
But all of them let you keep your mug of toasty warm beverage right there with your snack of choice...in this case, my sister's super yummy Black-eyed Susan cookies!
It took me a little while to get it right. I had never done machine sewing before, even in the smallest of projects, but I think they turned out all right.
Did you get any homemade Christmas presents this year?
I made.....MUG RUGS! Each person's fabric coordinated with their tastes.
Some were traditional...
Some were more modern...
But all of them let you keep your mug of toasty warm beverage right there with your snack of choice...in this case, my sister's super yummy Black-eyed Susan cookies!
It took me a little while to get it right. I had never done machine sewing before, even in the smallest of projects, but I think they turned out all right.
Did you get any homemade Christmas presents this year?
Monday, January 23, 2012
Kate's Dress
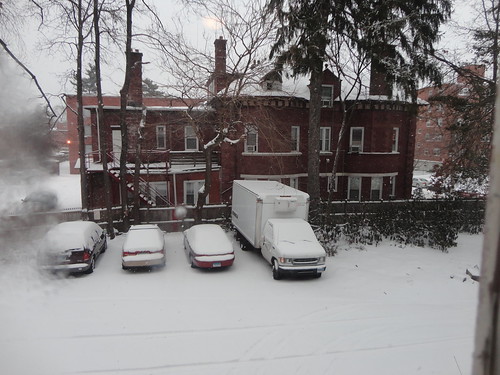
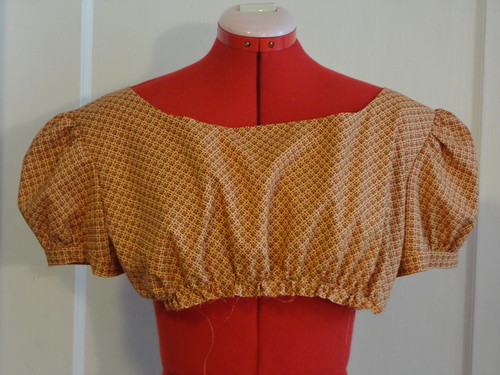
I'm making my friend Kate a dress, an 1810s dress. We found this beautiful fabric and since I didn't have work on Saturday because it looked like this outside...
I spent the day working on it. It is so nice getting a large chunk of time to devote to a single project, you can always make such progress. I did a bit of Frankenstein work on the pattern, since Kate liked the top of one pattern but wanted it with the short, puffed sleeves or the other pattern. So, this is the resulting bodice.
And here is the entire dress. I think it turned out really nicely, and the color for the sash is perfect.


There is also fabric to make a brown spencer jacket, which uses the long sleeves that are supposed to be on this dress combined with an adjusted pattern for the other dress bodice with a lot of tweeks. You'll be seeing that project later.
What do you like to work on when you find yourself with extra time?
I spent the day working on it. It is so nice getting a large chunk of time to devote to a single project, you can always make such progress. I did a bit of Frankenstein work on the pattern, since Kate liked the top of one pattern but wanted it with the short, puffed sleeves or the other pattern. So, this is the resulting bodice.
And here is the entire dress. I think it turned out really nicely, and the color for the sash is perfect.
There is also fabric to make a brown spencer jacket, which uses the long sleeves that are supposed to be on this dress combined with an adjusted pattern for the other dress bodice with a lot of tweeks. You'll be seeing that project later.
What do you like to work on when you find yourself with extra time?
Monday, January 9, 2012
A new camera means a new camera case
This Christmas I was lucky enough to get a new digital camera. It has been great so far (and took these wonderful pictures). Since its shape is a little different than my last digital camera, I needed a new case.
In an attempt to make one that would protect the screen and be compact enough for carrying in my purse, I decided to do a simple felt case. I couldn't make it too simple, however. It had to have a little pop!

So it got its own little camera. Not too bad for free handing (well, free cutting) it.
Have you made anything to complement a holiday gift?
In an attempt to make one that would protect the screen and be compact enough for carrying in my purse, I decided to do a simple felt case. I couldn't make it too simple, however. It had to have a little pop!
So it got its own little camera. Not too bad for free handing (well, free cutting) it.
Have you made anything to complement a holiday gift?
Saturday, January 7, 2012
Oh my!!
I can't believe I haven't blogged since October 24th!!! Well, maybe I can, it's been a busy end of the year. After the major Halloween snowstorm we had here in New England, life just got crazier. But, my New Years goal (I like goals rather than resolutions, they feel less daunting)...Be A Better Blogger! I've got some fun posts planned already, so, if I haven't lost you yet, keep checking in...(I hope to keep with my early week posts).
Happy New Year!
Happy New Year!
Subscribe to:
Posts (Atom)