
We decided that something light and airy would be perfect, and settled on a mid-century credenza-style TV stand. After realizing that a credenza might be a bit long for the wall, we decided to keep an open mind, but stick to that sort of look. Of course, we did not want to just go out and buy something, because we pride ourselves on a nice mix of aesthetics in our apartment: antique, contemporary, refurbished, bold, neutral, etc. So, after carefully measuring our space, we went on the hunt. I think we each trolled Craigslist about five times a day, plus stopped in every antique store and resale shop we came across over the last month. Finally we found something! Below is a brief history of how we made our new TV stand...
After relentless searching, we finally found this gem on Craigslist last week for.....$50!!!! I'd say that's a pretty perfect price!
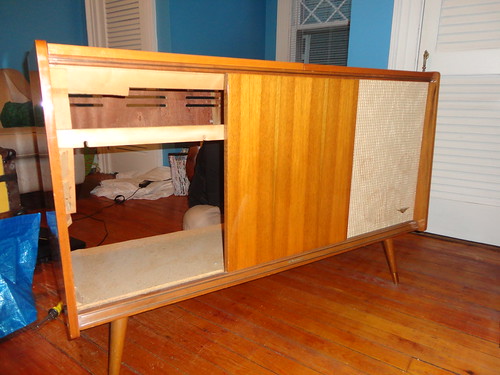
Now, don't get confused. After we picked it up and got it home I thought "hmmm...I'll put in dinner and then we can start working on this while it cooks." Silly Me! I forgot how we work in our household...something comes in and it INSTANTLY gets started! By the time I put dinner in the oven, Jess had already taken one of the speaker fronts off...so this is only a sort-of before picture.
As you may have realized with the mention of speaker fronts, this is not a credenza but a mid-century stereo cabinet. The previous owner had already removed all the internal workings for the stereo, but that just made our job less difficult and much less guilt ridden! (For the longest time we were finding "working" stereo cabinets online but just couldn't muster the resolve to rip out a perfectly good stereo.) Since the finish on the wood was in beautiful shape, we did not have to worry about stripping or refinishing.
We built a shelf to go inside each of our soon-to-be-created cabinets. One on the right measured to fit the DVD player, old-school Nintendo, and the Wii; and one on the left to hold some of our DVDs.
When we pulled off the speaker fronts we were left with this...
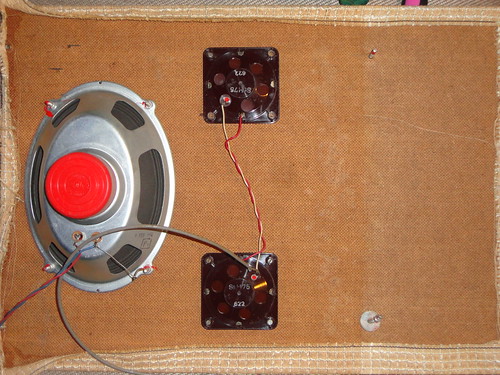
We removed all the speaker components and the old fabric coverings...being careful to first remove the applied stereo emblem so we could re-attach it later. It was amazing how many teeny tiny bolts, nuts, and washers were holding this thing on!
Next we covered the speakers with a thin layer of batting to camouflage the holes left by the speakers, and then covered the entire front with some fun fabric purchased for just this occasion.
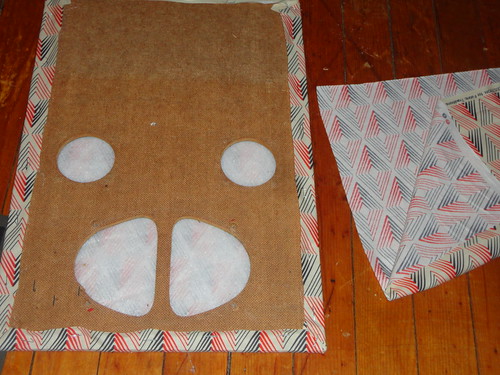
We decided to go with something modern, but with a vintage feel to compliment the mid-century design. After wrapping the front tightly and stapling it around back, we cut a piece to cover up the backside so when the door is open you can't see the rough edges. We didn't want the staples showing, so after turning under the edges it was hot glued in place.
Once the doors were finished, we added gold nobs, replaced the stereo emblem and hinged the doors onto the front of the cabinet. This is where our major "oops!" moment came in...we had cut down the top of the speakers so they would sit on the outside of the cabinet (they had originally been mounted on the inside) but had forgotten to cut down the sides to allow for the hinges. However, with some quick thinking from Jess, the doors were mounted and it was ready for the television.

We were pretty pleased with how our first furniture DIY for the new apartment turned out.
Have you ever tried making over a piece of furniture? Did you find it harder than all those blogs make it look, or easier? Most importantly, did you follow that good ol' fatherly advice to measure twice and cut once?!?
You guys are ridiculously crafty! Love it!
ReplyDelete