Showing posts with label dress. Show all posts
Sunday, January 26, 2014
Make Do...in more ways than one!
Last year I followed along oogling over the projects various sewers were creating for The Historical Sew Fortnightly Challenge hosted by The Dreamstress. This year, I decided to join in on the fun. The reason is multifaceted a) it will encourage me to make some of the wonderful historical garments I incessantly pin on Pinterest, b) it will get me back into the swing of posting on this little blog of mine and sharing projects with my family, and c) it sounds like a fun creative challenge.
I've decided to aim for doing the "half marathon." In other words, instead of trying to do all 24 challenges, I'll aim to participate in 12 challenges. That way I will have a month to work on each challenge, rather than two weeks, which I just don't see fitting in well to my current busy schedule!
The first challenge this year is entitled Make Do & Mend. I ended up starting this challenge a little early, as I was looking to make myself a new dress to wear for Christmas and the parties that come with it. I went digging in my stash of vintage patterns and found one from Jessica's grandmother...one of those fabulous mail-order patterns! When I started working on the dress I thought it would be perfect for this challenge as it would fit the theme in a couple of different ways. First of all, the dress looked to be from the 1940s and therefore might have been made by someone in the midst of the Make Do & Mend movement during WWII. And secondly, it was made entirely of fabric I found in my stash. Originally I wanted the main body of the dress to be the print, with the accents in solid red...but lo and behold I didn't have enough print to do that so I had to change it up to make do with the fabric I already had.
Now...here is where I failed on this challenge. Most of my interest in historical fashion is in the extended 19th century...ask me when a garment was made during that period and I can narrow it down to 5 years or less. Post-1925, however, I'm still working on really getting to know all the little nuances as fashions began changing more rapidly and the ready-to-wear industry boomed with fashion trends, in general, starting to move more quickly. So, I went online to look up this pattern to see if I could find an exact date...I was guessing it was somewhere around the mid-1940s, so right about the cutoff date of 1945. Good news...I found an advertisement for this dress in a newspaper online! Check it out here. Now, if you went to the link you have probably already guessed the bad news. That's right, according to the newspaper advertisement the dress is from 1950. Whomp whomp. :-(
I've decided to go a head and post it, as I fully believed when I was making it that it would be perfect for this challenge. I guess I'll just have to date before I make when tackling something 1940s for any future challenges!!
The Challenge: Make Do & Mend
Fabric: 100% cotton, both print and solid
Pattern: Sue Burnett 8419
Year: 1950
Notions: snaps and hooks for the side placket closing
How historically accurate is it? Pretty accurate
Hours to complete: Hmm...forgot to track this...probably around 6-8?
First worn: Work holiday party
Total cost: Nothing right then...everything was from my stash
Monday, July 16, 2012
The Story of a Tank Dress
My sister Emily posted a link on my Facebook to a blog she thought I would like...well, as usual, she was right. Not only did I immediately fall in love with, and make, the tutorial she linked to, but I spent a good portion of tonight reading all the way to the beginning! What was this wonderful blog and tutorial my sister sent me, you may ask? Sweet Verbena, right here on Blogger. Katy has some great tutorials, plus an adorable puppy that I sort of covet...he looks like Josephine, only a dog :-)
The tutorial Emily sent me was for Katy's tank-top turned dress, you can find it here. Now, I forewarn, this is not a tutorial, it is simply a few pictures showing you how it went when I followed Katy's tutorial. If you want the real thing, click on over to Sweet Verbena.
Here is the fabric, and the tank top I used. They made for a nice combination.
I followed along carefully and cut my tank top, sewed the elastic to the bottom, cut the fabric, and cut out the pockets...see...
It's a little blurry, but you get the idea. I was surprised at how easy doing the pockets were. I don't know why I always assumed pockets would be difficult, they aren't...at all.
Next, it was time to sew the skirt portion together. It looked a little funny lying on the floor...
But it turned out just how it was supposed to! Next I gathered it at the top and stitched it to the tank top. I had Jessica try it on before I ironed it, it was sort of funny because the freshly gathered skirt before ironing made it REALLY poofy at the seam and it gave Jessica a very odd shape. Luckily, after some ironing it looked pretty good. Here's Jessica's finished tank dress.
I think I just may have to make one for myself! As with all tutorials, I learned something about my own materials and how you sometimes have to adjust what you are doing based on slight differences. For instance, since ribbed tank tops have much more built in stretch, I should have made the elastic piece around the bottom a little larger to make it even easier to get on and off. Oh well, at least it still fit!
Have you discovered a new blog lately? Saw something you just had to create right then? Or just shared some inspiration with family?
The tutorial Emily sent me was for Katy's tank-top turned dress, you can find it here. Now, I forewarn, this is not a tutorial, it is simply a few pictures showing you how it went when I followed Katy's tutorial. If you want the real thing, click on over to Sweet Verbena.
Here is the fabric, and the tank top I used. They made for a nice combination.
I followed along carefully and cut my tank top, sewed the elastic to the bottom, cut the fabric, and cut out the pockets...see...
It's a little blurry, but you get the idea. I was surprised at how easy doing the pockets were. I don't know why I always assumed pockets would be difficult, they aren't...at all.
Next, it was time to sew the skirt portion together. It looked a little funny lying on the floor...
But it turned out just how it was supposed to! Next I gathered it at the top and stitched it to the tank top. I had Jessica try it on before I ironed it, it was sort of funny because the freshly gathered skirt before ironing made it REALLY poofy at the seam and it gave Jessica a very odd shape. Luckily, after some ironing it looked pretty good. Here's Jessica's finished tank dress.
I think I just may have to make one for myself! As with all tutorials, I learned something about my own materials and how you sometimes have to adjust what you are doing based on slight differences. For instance, since ribbed tank tops have much more built in stretch, I should have made the elastic piece around the bottom a little larger to make it even easier to get on and off. Oh well, at least it still fit!
Have you discovered a new blog lately? Saw something you just had to create right then? Or just shared some inspiration with family?
Monday, May 21, 2012
A Great Week
Well, I think I have finally recovered from last week's Brimfield excursion. We've managed to get our Brimfield trips down pretty well...we know which vendors have stuff we like, where the prices are good, and who is willing to haggle. We've also figured out how to see everything we want to see and get in and out in under 6 hours! Granted, when we decide to make the trek without a trusty list in hand and predetermine to just wander around and look for what inspires us, well....those trips are a bit longer...
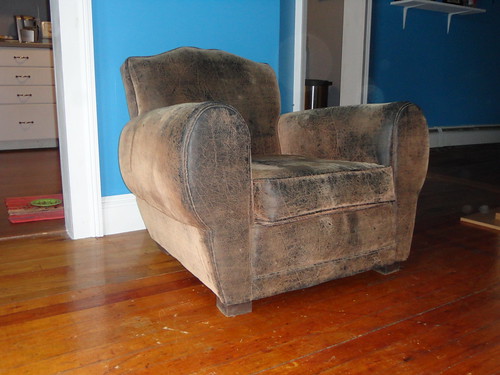
This, was not one of those trips. We managed to get very lucky and found the most desired and largest item on our list (a club-style chair for the living room) towards the beginning of the day, which meant we knew exactly how much room was left in the car for bringing home other treasures. It is always fun to see people stop and watch us as we carefully maneuver our treasures into our Pontiac Vibe...it isn't a large vehicle, but as we are fond of saying "it may be small, but we know exactly how big it is." Here is what we brought home...
And yes, our beautiful cat Annie thinks that we bought it just for her sleeping enjoyment! Ah well, whatever keeps her happy...as long as she shares.
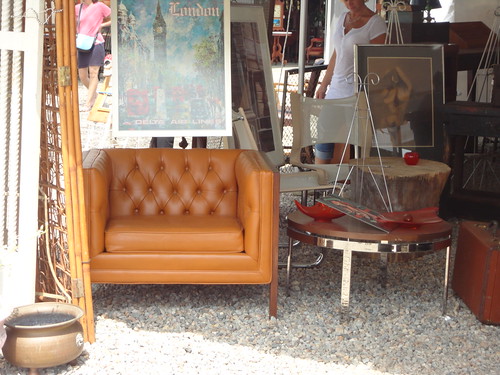
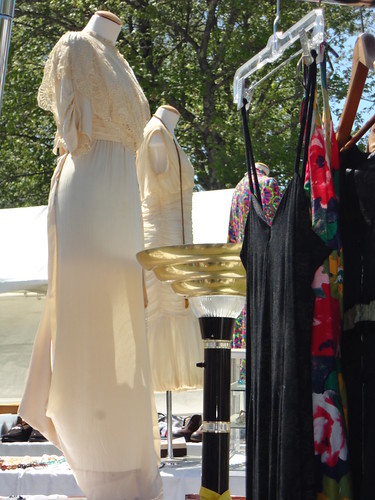
Here is a glimpse of some items that did not make it home with us, but were sufficiently drooled over...
This, was not one of those trips. We managed to get very lucky and found the most desired and largest item on our list (a club-style chair for the living room) towards the beginning of the day, which meant we knew exactly how much room was left in the car for bringing home other treasures. It is always fun to see people stop and watch us as we carefully maneuver our treasures into our Pontiac Vibe...it isn't a large vehicle, but as we are fond of saying "it may be small, but we know exactly how big it is." Here is what we brought home...
And yes, our beautiful cat Annie thinks that we bought it just for her sleeping enjoyment! Ah well, whatever keeps her happy...as long as she shares.
Here is a glimpse of some items that did not make it home with us, but were sufficiently drooled over...
Our circa 1912 bride just barely didn't come home with us. We found her at the end of the day and by then had already spent our budget for the event..and I was trying to be good. So instead, I just snapped this quick picture and will look for her again in July. Doubtful she'll still be there, but you never know at Brimfield.
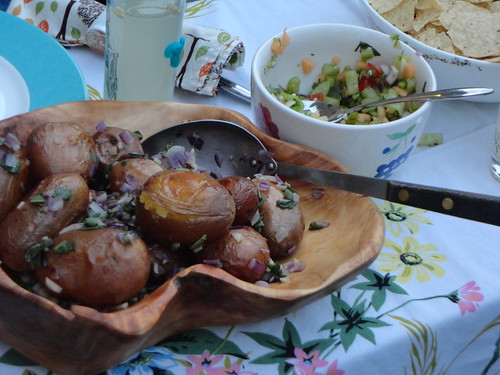
After our weekend trip, we had a nice week of good weather and managed to enjoy some of it with a friend of ours. It was our first real dinner guest at our new place. We made veggie kabobs with homemade bbq sauce, grilled pineapple, fresh tomatillo salsa, and potatoes with onions and sage...and awesome vegan apple cinnamon cupcakes for dessert! We didn't have our table project finished yet (which you will all get to see eventually) so we ate out on the back deck and used the deck box as a table. Of course it was dressed up with some vintage linens from my Aunt and our awesome serving dishes.
Yay for friends and a good week. Here's hoping this coming week is just as great.
Have you found any treasures lately? Had to pass something up because you were "being good?" Or just had a friend over to enjoy a nice Spring evening?
Thursday, February 23, 2012
One 1810s dress...DONE!
I finally finished Kate's dress and spencer jacket this weekend. I was in need of a little added inspiration, so I put on Mansfield Park and set to work. All in all it turned out pretty well. The spencer gave me some headaches, but since I do not yet have a lot of practice in pattern adjustment I think it all worked out in the end. Here is the finished product
Kate is coming to pick it up on Sunday and I can't wait to see how the spencer fits. The last time she tried it on it was a muslin mock-up with one sleeve!
In other news, you might start seeing a little bit more decorating type DIY on Midwest Nutmeg. We are moving into a new apartment and it needs a little bit of design to make it home. So, expect a few DIY home projects, before and after photos, and who knows what else. It is a new and exciting adventure!
Have you finished any projects lately? Or planning any life changes?
Kate is coming to pick it up on Sunday and I can't wait to see how the spencer fits. The last time she tried it on it was a muslin mock-up with one sleeve!
In other news, you might start seeing a little bit more decorating type DIY on Midwest Nutmeg. We are moving into a new apartment and it needs a little bit of design to make it home. So, expect a few DIY home projects, before and after photos, and who knows what else. It is a new and exciting adventure!
Have you finished any projects lately? Or planning any life changes?
Monday, January 23, 2012
Kate's Dress
I'm making my friend Kate a dress, an 1810s dress. We found this beautiful fabric and since I didn't have work on Saturday because it looked like this outside...
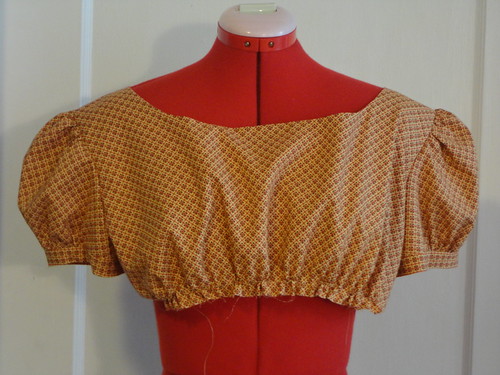
I spent the day working on it. It is so nice getting a large chunk of time to devote to a single project, you can always make such progress. I did a bit of Frankenstein work on the pattern, since Kate liked the top of one pattern but wanted it with the short, puffed sleeves or the other pattern. So, this is the resulting bodice.
And here is the entire dress. I think it turned out really nicely, and the color for the sash is perfect.
There is also fabric to make a brown spencer jacket, which uses the long sleeves that are supposed to be on this dress combined with an adjusted pattern for the other dress bodice with a lot of tweeks. You'll be seeing that project later.
What do you like to work on when you find yourself with extra time?
I spent the day working on it. It is so nice getting a large chunk of time to devote to a single project, you can always make such progress. I did a bit of Frankenstein work on the pattern, since Kate liked the top of one pattern but wanted it with the short, puffed sleeves or the other pattern. So, this is the resulting bodice.
And here is the entire dress. I think it turned out really nicely, and the color for the sash is perfect.
There is also fabric to make a brown spencer jacket, which uses the long sleeves that are supposed to be on this dress combined with an adjusted pattern for the other dress bodice with a lot of tweeks. You'll be seeing that project later.
What do you like to work on when you find yourself with extra time?
Tuesday, September 27, 2011
1940s Dress...the end
Well folks...here it is! The 1940s dress got done just in time for the Saturday Lobster Dinner. And by just in time, I really do mean it. I was doing hems, sewing buttons, and finishing zippers Friday night. But, it all worked out and I think it turned out rather well.
The one part I ended up having a little trouble with was the one part I had not practiced on the muslin. The buttons at the collar go through bounded button holes. Now, bounded button holes are actually fairly simple to make, the difficulty came when I made them on the wrong side. So, I had to do a bit of hand work to make it all work out because it was a little late when I realized what I had done and it was no longer a simple fix with a seam ripper.
To make sure that the dress looked a little more modern vintage and a little less costume, we decided to nix the self-fabric belt for the time being. It got jazzed up with a skinny black belt and some black sandals. It looked pretty good!
Did you finish any good projects over the weekend?
The one part I ended up having a little trouble with was the one part I had not practiced on the muslin. The buttons at the collar go through bounded button holes. Now, bounded button holes are actually fairly simple to make, the difficulty came when I made them on the wrong side. So, I had to do a bit of hand work to make it all work out because it was a little late when I realized what I had done and it was no longer a simple fix with a seam ripper.
To make sure that the dress looked a little more modern vintage and a little less costume, we decided to nix the self-fabric belt for the time being. It got jazzed up with a skinny black belt and some black sandals. It looked pretty good!
Did you finish any good projects over the weekend?
Tuesday, September 20, 2011
1940s dress...the beginning
Back in June I posted about some awesome vintage patterns I purchased, along with some wonderful red, white, and blue fabric from Moda. Well, I finally started on the dress! First thing was first, though...I had never sewn with a vintage pattern before, so I wanted to make sure I really knew what I was doing and everything would fit well before I cut into my fashion fabric.
I was both pleasantly surprised, and super intimidated, when I opened the pattern envelope. Surprised because, since you buy exactly the size you need, there is no pattern cutting...YAY! That has always been one of my least favorite parts, because I inevitably tear the delicate paper of the pattern pieces. The part that intimidated me was the single sheet of instructions...not only that, but it was only one side of the sheet! They were relying on the fact that most women knew something about sewing clothing in the 1940s.
I decided that since I was just doing a dry run of the pattern, I would not waste fabric doing more than necessary. I only cut out one sleeve and only cut the skirt pieces down about 12 inches from the waist, enough to do the waistline, while just checking the length with the paper pieces.
This is what I ended up with...and am I ever glad I decided to do it! No part of the pattern was difficult, but some parts were a little confusing the way they were worded in the directions (or lack-there-of). Now I feel much more confident to cut it out of the fashion fabric.
You will get to see the finished product soon. Currently it is still in pieces on my ironing board, but since it must be finished for the Annual Lobster Dinner at the Litchfield Museum on Saturday, I better get to sewing!
Have you finally tackled a project you've put off all summer?
I was both pleasantly surprised, and super intimidated, when I opened the pattern envelope. Surprised because, since you buy exactly the size you need, there is no pattern cutting...YAY! That has always been one of my least favorite parts, because I inevitably tear the delicate paper of the pattern pieces. The part that intimidated me was the single sheet of instructions...not only that, but it was only one side of the sheet! They were relying on the fact that most women knew something about sewing clothing in the 1940s.
I decided that since I was just doing a dry run of the pattern, I would not waste fabric doing more than necessary. I only cut out one sleeve and only cut the skirt pieces down about 12 inches from the waist, enough to do the waistline, while just checking the length with the paper pieces.
This is what I ended up with...and am I ever glad I decided to do it! No part of the pattern was difficult, but some parts were a little confusing the way they were worded in the directions (or lack-there-of). Now I feel much more confident to cut it out of the fashion fabric.
You will get to see the finished product soon. Currently it is still in pieces on my ironing board, but since it must be finished for the Annual Lobster Dinner at the Litchfield Museum on Saturday, I better get to sewing!
Have you finally tackled a project you've put off all summer?
Wednesday, March 16, 2011
A Sewing Project
My friend Kate, who also works for a non-profit, asked if I could help her out. She's been doing some of the muesum education programs in costume so the kids get a visual of one of the ways life was different in the past. There was an 1820s style dress that was not quite right, so...sewing machine to the rescue! One of the major problems (besides being a little big) was that the dress did not provide much modesty when it came to actively teaching children.
I dug out an old pattern for undergarments and accessories of the early 1800s from a box under my bed. We picked out this little undergarment that would go under the dress and provide a bit of modest coverage. Since it was going to be right next to the skin, I decided this called for some super soft Egyptian Cotton...Oooo.
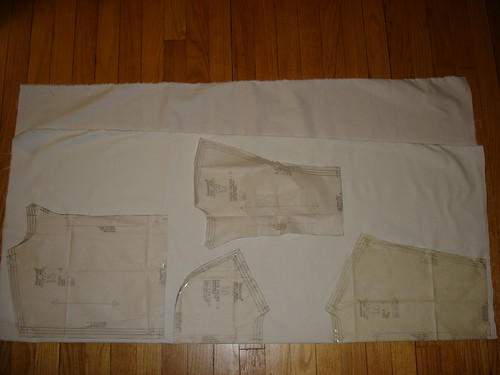
Notice all the extra fabric? I like to make sure I have plenty, I'm always scared I'll read the pattern wrong or mess it up and need more....plus, the scraps are so usefull!
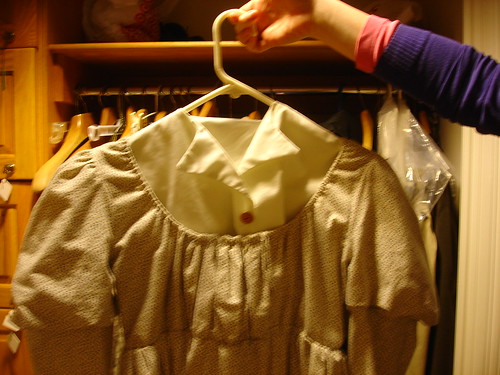
Here is the finished product hanging in front of our nice blue living room walls! It fits right up against the rib cage and buttons up the front (with buttons from the button jar, of course). Since it cinches at the ribs, it can adjust to fit the wearer.
And this is how it looks under the dress (Kate was kind enough to allow a quick picture). And we thought the look of a crisp white shirt under a low-cut dress was new!!! I also added a draw string at the waist and the neckline so the dress can vary just a bit in size, plus added a pocket to one side so Kate can carry her keys with her. Always great to help out a fellow non-profit employee.
Have you ever found the solution to a sewing problem hiding in a box under your bed?
I dug out an old pattern for undergarments and accessories of the early 1800s from a box under my bed. We picked out this little undergarment that would go under the dress and provide a bit of modest coverage. Since it was going to be right next to the skin, I decided this called for some super soft Egyptian Cotton...Oooo.
Notice all the extra fabric? I like to make sure I have plenty, I'm always scared I'll read the pattern wrong or mess it up and need more....plus, the scraps are so usefull!
Here is the finished product hanging in front of our nice blue living room walls! It fits right up against the rib cage and buttons up the front (with buttons from the button jar, of course). Since it cinches at the ribs, it can adjust to fit the wearer.
And this is how it looks under the dress (Kate was kind enough to allow a quick picture). And we thought the look of a crisp white shirt under a low-cut dress was new!!! I also added a draw string at the waist and the neckline so the dress can vary just a bit in size, plus added a pocket to one side so Kate can carry her keys with her. Always great to help out a fellow non-profit employee.
Have you ever found the solution to a sewing problem hiding in a box under your bed?
Tuesday, March 8, 2011
A hidden advantage to craftyness...
I am constantly a girl on the hunt for a bargain, and often times that means finding something on the racks that is there because of a small problem making it undesirable to most, but perfect for us crafty types! This weekend I spent a much needed mini-vacation in Providence....Boston is cool, and I love living close to Manhattan, but Providence will forever hold a special place in my heart as my favorite city in the North East. While there, a few bargains found their way back to Connecticut. One of them required a bit of crafty ingenuity to make them perfect.
Although these mitts are wonderful, they came with a slight flaw....the severe lack of a button on the right mitt. This is one reason I love being crafty. Instead of having to pass up the amazing green pair (this was the only pair left) and having to go with the "safer" black pair that boasted two buttons, I was able to bring them home, dig through my button jar, and make them perfect once more!
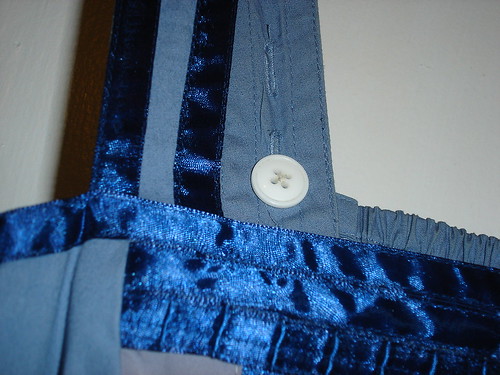
This is the ever ellusive, "perfect crafter's bargain." A dress, still being sold in the store at full price, but this particular one found its way to the bargain rack because it was missing one of the all-important buttons that held the strap to the dress. Easy Fix!!!! Again, to the button jar I went, and I emerged with an amazing dress at half the price, just because I was able to change out some missing buttons!
One of the best parts of our trip, however, (besides visiting friends, of course) was going to the Elmwood Diner in Providence and eating these AMAZING orange and cinnamon pancakes with sweet butter and real maple syrup. I'll have to hunt down a recipe for these :-)
Have you ever found a hidden bargain because of your crafty abilities?
Although these mitts are wonderful, they came with a slight flaw....the severe lack of a button on the right mitt. This is one reason I love being crafty. Instead of having to pass up the amazing green pair (this was the only pair left) and having to go with the "safer" black pair that boasted two buttons, I was able to bring them home, dig through my button jar, and make them perfect once more!
This is the ever ellusive, "perfect crafter's bargain." A dress, still being sold in the store at full price, but this particular one found its way to the bargain rack because it was missing one of the all-important buttons that held the strap to the dress. Easy Fix!!!! Again, to the button jar I went, and I emerged with an amazing dress at half the price, just because I was able to change out some missing buttons!
One of the best parts of our trip, however, (besides visiting friends, of course) was going to the Elmwood Diner in Providence and eating these AMAZING orange and cinnamon pancakes with sweet butter and real maple syrup. I'll have to hunt down a recipe for these :-)
Have you ever found a hidden bargain because of your crafty abilities?
Subscribe to:
Posts (Atom)