Some craft projects are thought about long and hard and executed after hours of hard work and creative problem-solving. Others are created out of an immediate need. This is one of those projects.
I came home the other day and it was particularly stuffy in the apartment. You see, we have only one window in the living room and this gorgeous double door out to the deck. However, the door doesn't have a screen, so if you want to open the door to let in a breeze but don't want to let in the bugs, it is nearly impossible. And thus instant craft time ensued.
Have you ever seen those insta screen doors? Like this one. Well, it gave me an idea...so I gathered supplies and got to work.
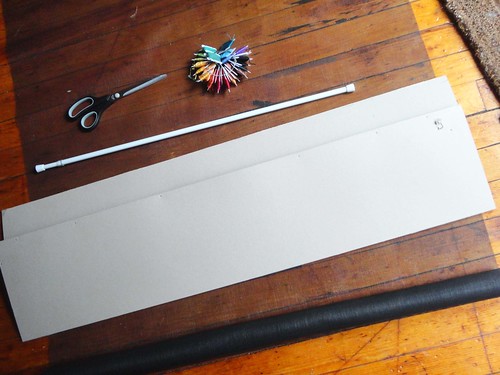
I actually ended up not using the cardboard, but forgot to retake the picture. It was a pretty simple project with a pretty simple idea. Plus it was the best kind of project because it used things I already had around the house, including some leftover nylon screening.
* Cut screening the length of the door plus about six inches.
* Fold over the top 3" to create a casing, and stitch. I decided to use some fun embroidery floss to add some interest.
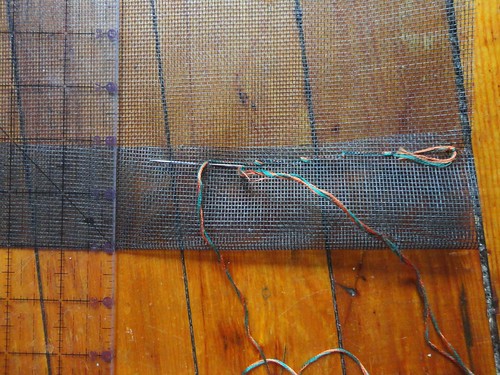
* Slide the tension rod through the casing and adjust to fit at the top of the door.
You can also create a casing at the bottom of the screen and slide in some cardboard, weights, or anything you can think of to weigh the bottom down. I left enough extra at the bottom to do just this, but I was desperate for some cool air and decided to add that feature later.
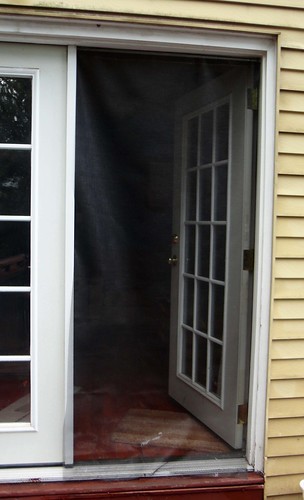
Somehow I got lucky enough that the screening we had was the exact width of the doorway. Not sure how that happened, but I sure am glad it did! If your screen is too wide, just trim it down a bit before you start. You want to make sure it will fit from side to side with a bit of extra to close any gaps. Now, this does not work for keeping cats in or out (it took Annie about 2 minutes to figure out if she headed to the corner she could just push it back). However, that might change depending on what we use to weigh it down. But it did significantly cut down on the house flies and flying insects that came into the house.
So, yay for instant crafts, a cooler house, and a project using nothing but found supplies!!!
Have you done any instant crafts lately? Become so desperate you just have to finish a project right now? Or just any home improvements? Or, in our case, removable apartment improvements?
Showing posts with label Summer. Show all posts
Tuesday, August 14, 2012
Wednesday, June 27, 2012
A Little Bit of Gardening
Well, summer is off to a great start! I spent over a week visiting family in Illinois, which means I can finally show you some of the birthday presents I made for my niece...but more on that later. I wanted to share this quick post about my spring/early summer gardening adventure. I took some of these pictures a while back and thought it was about time I post them.
It all started back in March when I was inspired by this post at Young House Love. I thought, hmmm...maybe I should try starting our herbs from seeds this year. So, I went out and picked up an indoor greenhouse and a few different herbs that we tend to use on a regular basis. It was sort of nice to see a little bit of spring start to sprout in our very cold Connecticut apartment.
By May they were ready to be re-planted outside...
We had the starts of Rosemary, Parsley, Basil, Oregano, Lavender, and Cilantro for our little herb garden...plus Catnip to draw our curious baby cats away from the other herbs! We planted them each in their own little pot, and also picked up a few flowers to plant. Now, this being my first independent container-gardening adventure, I encountered a few bumps along the way. Well, actually one major bump, but it was entirely fixable.
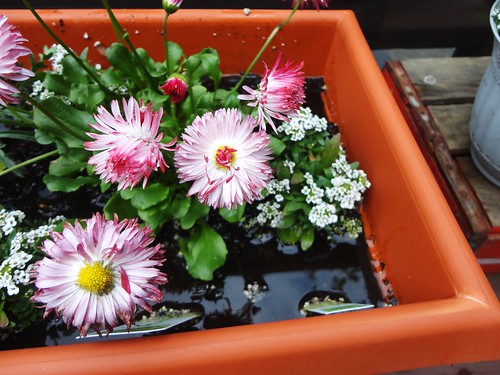
After a few weeks of spring rains, I realized that the large pot of flowers was looking like this...
Not good! Obviously I had a bit of a drainage problem. So, I went about on a rescue mission to save my drowning flowers. After buying some much needed supplies, including rocks for the bottom of the planter, I was ready to tackle the water problem. With a trusty turkey baster (that later went through the dish washer twice...just to make sure), I was able to siphon off most of the standing water, retrieve my drowning plants, and start all over again. Now, don't worry, I didn't just throw the sopping wet soil aside, I just redistributed it over some already existing flowerbeds in the yard where it could slowly dry out.
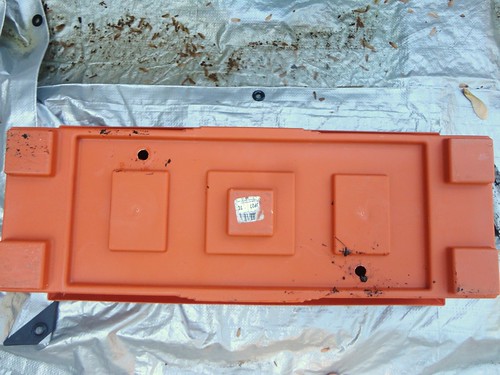
As I was checking everything out to see what all was contributing to the problem (aka...was I just a bad beginning gardener, or was the pot also working against me), I turned the planter over and found this...
That's right, a large planter with two...count them two drainage holes! Luckily this was easy to fix and after about 2 minutes with my handy drill I had this...
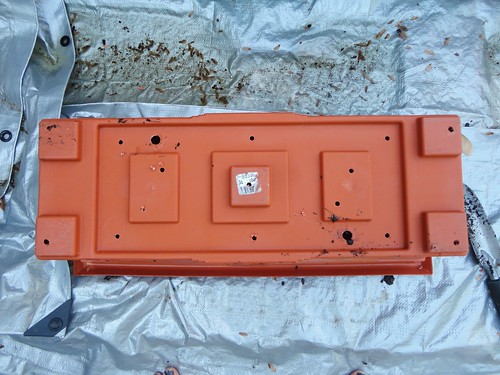
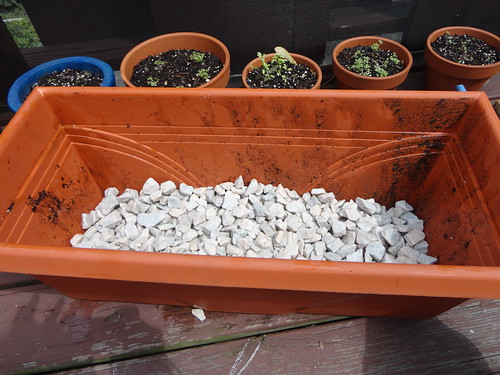
A large planter with 17 drainage holes. Much better. I proceeded to fill the bottom of the planter with rocks and replant my flowers.
You can see the freshly planted herbs in the background. I did end up losing a few of my small white edge flowers. I think they had been too far gone when I discovered the problem and didn't survive the transplanting. However, most things made it and I think they are looking pretty good right about now.
Here is a view of the deck container garden as of a few days ago.
The flowers are all blooming and the herbs are doing great! And yes, the catnip is at the bottom of the stairs so the baby cats can get to it easily. Everything started off just sitting in a clump on this side of the deck (it gets the most sun), but we wanted to change it up a little. We went hunting and found the crate and the stairs hanging around the apartment unused, so Jess decided this would be a perfect use for them. And judging from this picture, not only was she right, but also it might be about time to make some pesto!
It all started back in March when I was inspired by this post at Young House Love. I thought, hmmm...maybe I should try starting our herbs from seeds this year. So, I went out and picked up an indoor greenhouse and a few different herbs that we tend to use on a regular basis. It was sort of nice to see a little bit of spring start to sprout in our very cold Connecticut apartment.
By May they were ready to be re-planted outside...
We had the starts of Rosemary, Parsley, Basil, Oregano, Lavender, and Cilantro for our little herb garden...plus Catnip to draw our curious baby cats away from the other herbs! We planted them each in their own little pot, and also picked up a few flowers to plant. Now, this being my first independent container-gardening adventure, I encountered a few bumps along the way. Well, actually one major bump, but it was entirely fixable.
After a few weeks of spring rains, I realized that the large pot of flowers was looking like this...
Not good! Obviously I had a bit of a drainage problem. So, I went about on a rescue mission to save my drowning flowers. After buying some much needed supplies, including rocks for the bottom of the planter, I was ready to tackle the water problem. With a trusty turkey baster (that later went through the dish washer twice...just to make sure), I was able to siphon off most of the standing water, retrieve my drowning plants, and start all over again. Now, don't worry, I didn't just throw the sopping wet soil aside, I just redistributed it over some already existing flowerbeds in the yard where it could slowly dry out.
As I was checking everything out to see what all was contributing to the problem (aka...was I just a bad beginning gardener, or was the pot also working against me), I turned the planter over and found this...
That's right, a large planter with two...count them two drainage holes! Luckily this was easy to fix and after about 2 minutes with my handy drill I had this...
A large planter with 17 drainage holes. Much better. I proceeded to fill the bottom of the planter with rocks and replant my flowers.
You can see the freshly planted herbs in the background. I did end up losing a few of my small white edge flowers. I think they had been too far gone when I discovered the problem and didn't survive the transplanting. However, most things made it and I think they are looking pretty good right about now.
Here is a view of the deck container garden as of a few days ago.
The flowers are all blooming and the herbs are doing great! And yes, the catnip is at the bottom of the stairs so the baby cats can get to it easily. Everything started off just sitting in a clump on this side of the deck (it gets the most sun), but we wanted to change it up a little. We went hunting and found the crate and the stairs hanging around the apartment unused, so Jess decided this would be a perfect use for them. And judging from this picture, not only was she right, but also it might be about time to make some pesto!
Have you done any container gardening? Did you have instant success or end up on a learning curve like me? Or just re-purpose anything from around the house lately?
Subscribe to:
Posts (Atom)